
“Just a little adjustment to the framing… and the colours could be better too…”
This is a quick set of tips in my series of articles on improving your remote presenting game and it may be a bit device specific but I found it useful so I thought I’d share. While you’re here, don’t forget to check out the previous articles on audience engagement, single screen presentations and many other topics.
When presenting remotely, your video feed and your voice are the two carriers of your impression. Their quality is very important in determining the overall image you are projecting to your audience. Audio is a bit more important even given that you are actually trying to tell something so it is worth making sure that you have a good quality microphone and you are using it (it is the one selected in your software). I will devote a full article to improving your audio soon but this time around we are talking about video.
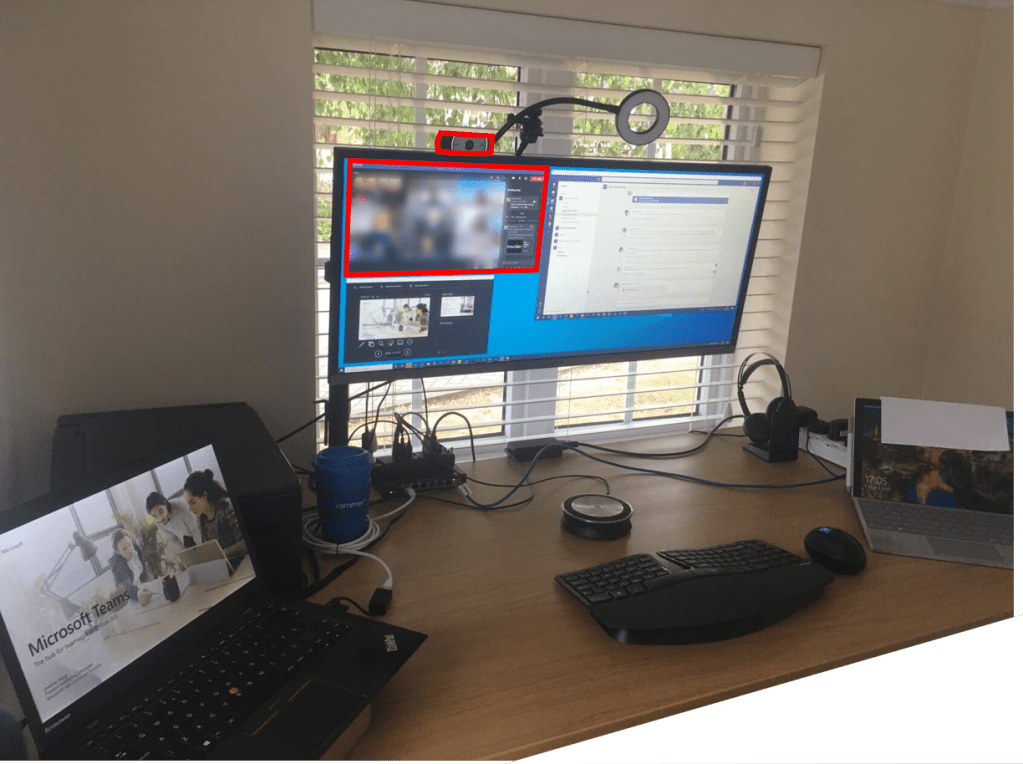
Remember the layout: your audience will see you through your camera. For you it is just an obscure black hole on a device near your screen but it is the eye of the audience. When you look straight into the lens of the camera, your audience will have the impression that you are looking them straight in the eye. You want to have this as much as possible to make a connection with them. If you are experienced and also know your material well then you can keep looking into the lens while speaking – some even have tricks for this like drawing a small face around the camera lens with a help of a post-it note so you are reminded that that is where you should be seeking eye contact. Because I have my webcam on the top of my external monitor I use the trick of dragging (even resizing) the window that I’m most likely to be looking at and positioning it near the camera. This way while I’m looking at my slides, my speaker notes or the video feeds from my audience I am almost looking into the lens. With the right alignment and distance it is almost indistinguishable whether I’m looking at my screen or the camera. If you want to go all-in, have an even better setup and actually be looking at the camera you can invest into a teleprompter or build one yourself like I did (drawing inspiration from this video). When you switch to a different screen – for example to switch to your hot screen for doing a demo – don’t forget where your camera is. If you have a camera near that other screen (like I have my laptop’s built-in webcam on the top of the hot screen) it is worth switching to that camera in the call.
Make sure your hardware is ready: modern web cameras have software inside them and they get updates every now and then. You want to have the latest firmware running on your devices so you take advantage of all the fixes and improvements. Both external cameras I’m using actively had firmware updates since they were manufactured and these updates vastly improved the image quality. You should also check out whether your camera will do everything it can with the build-in Windows drivers or whether you need to install anything extra. The same applies to camera controls: some cameras will have a special app available that will help you set the parameters for the camera (things like resolution, autofocus, zoom, viewing angle and many others). If your camera doesn’t have a controls app you want to try and see if the camera settings in the Skype consumer will let you access some of the controls at least.
Now that we have controls, make sure that you use them wisely: pay attention to the frame that you are recording. Where are the edges – where are you moving out of the range of the camera. Depending on how far you are from the lens you will have more or less opportunity to move, gesture and dance. Given that you are limited in your body language anyways, you want to use as much of this as possible. It is very easy to just sit there and stare into the slides and the camera. I like using my standing desk while presenting and step back a little and make some exaggerated moves to emphasize my points (standing also helps with my energy – just think of how it feels to present sitting down or standing up when you are in the same room). Of course – background, zoom, focus, colour balance
Speaking of the framing, you want to have a background that helps you – and there are so many ways for that. Remember, if you will be sharing slides or a screen then your video will be shown in a very small piece of the window so you don’t want a background that is too busy so that your facial expressions would be hard to see. (This is the default layout by the way, so when I do not need to read the slide I often switch to the video grid view in Teams to rather be watching the faces in large). You also need the right balance between the background and your face. This is where lighting is the most important.
Lighting: lighting a video scene is an art and a science on its own and I don’t claim to be an expert in it so I only recommend that you watch your image and make changes based on that. Your face should be well lit and better lit than your background. Modern webcams will work with whatever levels of light they are given so it is not only the total amount that counts but also the balance of lights. As an example, in my home office I’m facing my monitor with a large window behind while presenting but I also have a window directly to my left. When the light conditions change I sometimes get a better result by closing the blinds on my left. While this may be counter-intuitive as I’m reducing the total amount of light it still leads to a better result because it reduces light on my background and thus increases the relative light on my face and the webcam will balance out the lower availability of overall light anyways. A few, well-placed lights can do wonders in the look of your face over video and you can buy very good LED lights online.
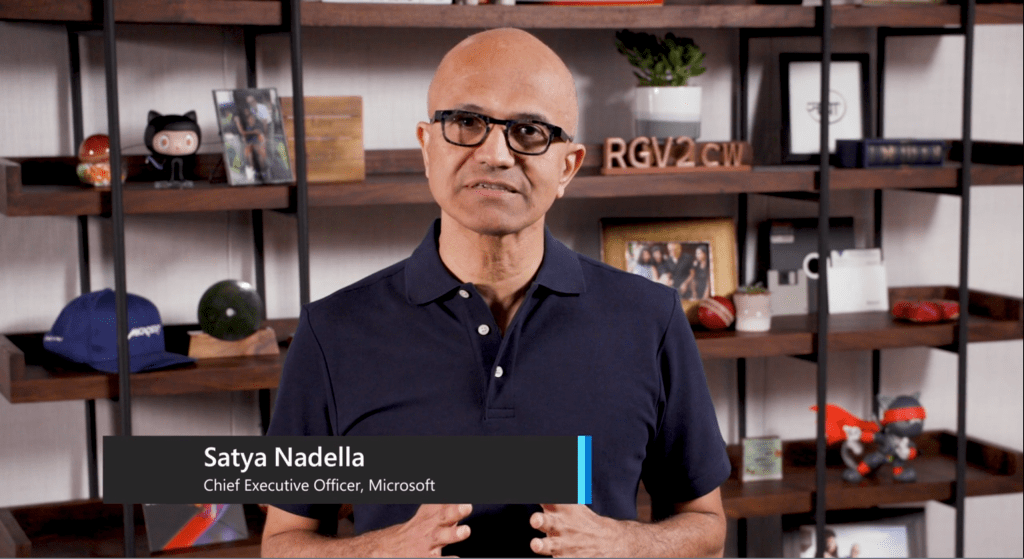
Background: whatever is visible around you in the video frame will carry a message to your audience. Make sure that it is intentional. A shelf of books, a painting or a photo will tell a story even if you don’t talk about it however you can also use them as props and point them out in your introduction or at some point in the presentation. I very much like the practice of our CEO of putting objects relevant to the content of the presentation on the shelf behind him when giving presentations:
If you want to seek inspiration from other people’s setups and maybe have some fun too, head over to the Room Rater twitter feed (Room Rater (@ratemyskyperoom) / Twitter) where you will see many people’s backgrounds analysed.
You can of course also use a virtual background just make sure that it will look good with your software and lighting setup. Different software packages do a very different quality job of removing backgrounds so make sure you test ahead of the time and you also want to make sure that you don’t want to show objects when using a virtual background as the software will try to only show your face and nothing else (or know how to turn background removal off quickly and make sure that your natural background is also presentable). The other thing to make sure is that your computer will be able to handle the extra computational power needed for the background removal. A natural background with good quality video and audio is much better than a fancy virtual background that causes your audio or video to be choppy.
As this is already a long article I’m not going to go into details but if you feel inspired you can start playing with mixing software like OBS Studio where you can combine multiple video sources and create engaging layouts and switch between them. You can achieve broadcast TV-like effects with the use of a single computer that can help give your presentation a lot of energy, tell your story better and just give a great impression to your audience. There are many guides and articles online about the how but if you’d like me to go into this in an article, leave a comment!
In closing, I will leave you with a link to a special project you can explore if you want to have a webcam that has real depth of field and gives you a lot of control over its workings. You can create your own webcam from a Raspberry PI Zero: Raspberry Pi 0 HQ USB Webcam | Hackaday.io
